

While riding your Harley it is a must to make sure your Harley Davidson Wheels are properly balanced to avoid any difficulties while enjoying your ride and ensure your ride is free from vibrations and wobbly steering sensations as you glide down the country road. It’s not all about making your ride more enjoyable, unbalanced wheels can have a very detrimental effect on the tires by creating uneven tread patterns and wear which can result in serious risk of injury if the bearings and the wheel spindle get worn out or the fasteners become loose due to the vibrations from the unbalanced tire.
This article presents itself as a safety guide and a wheel balancing manual for all bike riders to ensure you possess the right tools and the right knowledge to make sure you can balance your Harley Davidson Wheels tires yourself and head on out to the open roads.
Tools Required
- Counterweights
- Wheel Balancer
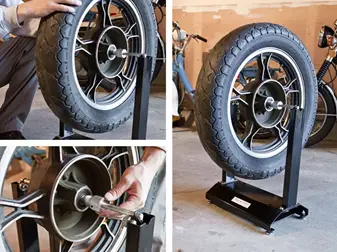
STEP 1: Remove the wheel from your motorcycle
Once you have identified that either one or both of your wheels are unbalanced, remove the wheels from your motorcycle using the specified tools.
STEP 2: Mount the wheel on your wheel balancer
Before mounting your wheel on the wheel balancer, ensure that the static balancer is properly leveled. To mount your wheel on the wheel balancer, remove one of the centering cones that are attached to your wheel axle to allow the axle to slide through the wheel center. To keep the wheel in place, reinstall the centering cone and make sure the screws on the centering cones on either side of the wheel are properly tightened. If the shaft is not properly secured in place it will continue to wabble. Make sure that the shaft that has been slide through the wheel is properly aligned on both sides of the wheel. If your wheel axle comes with screw-in stoppers or rubber stoppers, make use of them to keep the wheel in the desired fixed position. If there are wheel weights attached to the wheel, remove them before placing them on the wheel balancer.
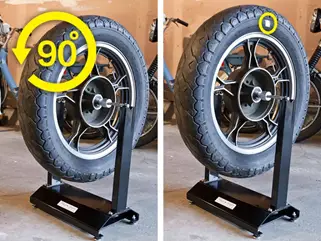
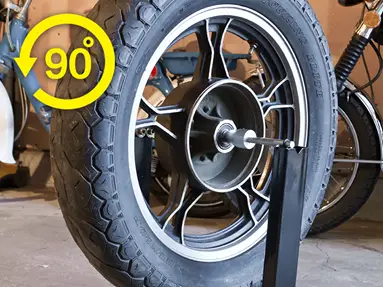
STEP 3: Mark the lighter side of the Wheel
To identify the lighter side of the wheel, turn it 90 degrees and let the wheel loose. Once the wheel stops moving, mark the top end of the wheel as it is on its lighter side. The heavier end of the wheel will be at the bottom.

STEP 4: Apply Counterweights
After marking the light end of the tire, apply the counterweights on the lighter end by sticking the adhesive side to the rim. Kindly make sure that the adhesive does not stick to the tire itself. The wheel weights are applied at the opposite end of the heavier side of the wheel. Let the wheel completely stop before applying the counterweights. Use a couple of test weights to see how much weight is it going to take to compensate for the heavier end of the wheel. Start with half an ounce of counterweight and move your way up from that weight. This step involves a lot of trial and error until you get used to how much counterweight it is going to take based on how fast the wheel is moving.
STEP 5: Recheck the Wheel Balancer
After applying the counterweights to the rims on the lighter side, rotate the wheel 90 degrees and let it loose. If the wheel has been properly balanced then it will not rotate and will stay in place, otherwise redo steps 3 and 4 until the wheel is properly balanced. Keep applying the counterweights until the wheel stops rotating.

STEP 6: Get your tape
After adding the correct amount of counterweight until the wheel stops rotating on the wheel balancer, get your tape which matches the color of your rims, and apply it on top of the counterweights that have been glued to the rim to keep them secure and in place while you are driving your motorcycle.
Checkout our article on How often should we lubricate Harley Davidson chain?
Well if you have made it this far we hope our guide will prove helpful in making sure you can balance your wheels at home without having to take your motorcycle to the workshop. This comprehensive guide contains all the tips and tricks you need to take care of to make sure you face no problems while balancing your wheels at home.
Happy Riding!


