

Learning how to clean a Motorcycle Chain is one of many novice riders’ first ventures into primary motorcycle care. Overall, it is a straightforward procedure that should just take around fifteen minutes.
This article will walk you through the most straightforward technique to clean a motorbike chain without a stand. Let us delve into it and get a sufficient understanding of it.
Steps Involved in Cleaning of Motorcycle Chain:
Let’s get started with how to clean a motorcycle chain through a step-wise guide.
1. Determine your Chain Type
The method you choose to remove the dirt will be affected by the sort of motorbike chain you use. A standard motorbike chain is made up of metal-on-metal links with no seals in between.
Plain motorbike chains, as a consequence, can be cleaned more vigorously than sealed motorcycle chains. A rubber seal is used between a filled motorbike chain’s inner and outer links to keep the lubricant inside the pin and bushing chamber and road dirt out. This layout contributes to the Chain’s lifespan while also necessitating a gentler approach to cleaning.
2. Place your Bike in the Proper Position
Cleaning the motorbike chain is a simple process, and it gets much easier if your bike has a center stand or a paddock stand. Either choice lets the back wheel and Chain on your motorbike spin freely, enabling for more practical application of chain cleaner.
However, in the unavailability of a stand, there are several other cleaning options. If you do not have any of the above stands, you can get by with your kickstand and some maneuvering around the driveway. Clean one part before moving the motorbike to access the next. Another option is to remove the Chain entirely and work on it that way.
3. Check the Chain and Sprockets
Getting up close and personal with your Chain when cleaning it gives an excellent opportunity to assess its physical condition.
While you are down there, look for chain wear. How much side-to-side wiggle space does your Chain provide? How much do the links slide back and forward when compressed? A well-maintained motorbike chain should allow for only minor variations in each. Then there is the tried and tested method for determining whether your Chain needs to be replaced. Your shop manual will provide the maximum length of your Chain for a certain number of links. If the number of links is greater than that, the Chain is too aged.
Here’s another simple technique to do an informal check. Pull-on a chain link at the rearmost section of the sprocket on the rear wheel. If the Chain is worn, it will pull away from the sprocket rather than embracing it as it should. The master link on a motorbike chain is the link that connects the two ends and will appear somewhat different from the surrounding links. Whether the master link is attached with a clip or rivets that have been peened over, now is a good time to double-check that it is secure.
You should also have a check at your sprockets. Your sprockets will deteriorate in a variety of ways depending on the condition of your chain and riding style. Keep a lookout for shark fins and sharp teeth while inspecting old sprockets. Shark fins form when the leading edge of a sprocket tooth wears faster than the backside.

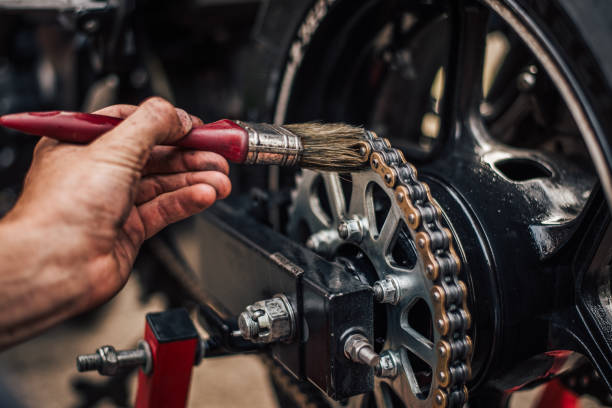
4. Apply Chain Cleaner on the Chain
It is now time to start scrubbing the dirt away. Kerosene can be effective in dissolving existing lubricant and dirt particles on the Chain. Do not be afraid to soak things up as you make your way around the Chain. Kerosene is inexpensive, but new motorbike chains are pricey. So go ahead and apply generously.
5. Scrub the Chain
After soaking the Chain, use a motorbike chain brush to remove the sticky dirt. For this purpose, you may use a brush that allows you to clean three of the four sides of your motorbike chain simultaneously. Make an effort to be comprehensive. It will pay off in the long run. A clean surface causes the motorbike chain oil to adhere better.
6. Re-Spray the Motorcycle Chain with Chain Cleaner
To complete the cleaning procedure, re-soak the motorcycle chain in your preferred cleaning agent. Ensure that the final traces of chain dirt have been blown away. Motorcycle chains are destroyed by gunk so remove as much of it as possible.
7. Let the Motorcycle Chain Dry
Motorcycle chain lubricant must be applied to a dry area for it to cling to the Chain. Before lubricating, thoroughly dry the Chain and wipe all of the chain cleaners.
8. Lubricate your Motorcycle Chain
The last and the most important step of maintaining your motorcycle’s Chain is lubricating it with the appropriate lube. Apply the lubricant equally to both sides of the Chain when it is clean and dry. It is far less likely to fling off the motorbike chain and cause a mess on other bike components with the use of the right lubricant.
When it comes to the best technique to lubricate a motorbike chain, there are a few distinctions to be made between plain and sealed chains. Maintaining a clean lubrication coating on a simple chain is the best means of ensuring that it continues to work effectively for large paths to come. With sealed chains, however, the grease inside the O-rings lubricates the Chain, and the chain lubricant you apply is only for protecting the exterior of the Chain from rust, so you should use it sparingly.
Checkout our article on the Top Tips for Safely Using GPS Navigation When Riding a Motorcycle.
Once you are done with all of the steps, you will be ready to enjoy a pleasant ride. It should be highlighted that frequent cleaning extends your Chain’s life and makes the ride much more comfortable. One helpful tidbit is before cleaning your Chain, always check to see whether it is worn.
This article attempted to provide some simple steps for cleaning and lubricating your motorcycle’s Chain. Although cleaning without a stand may take a little longer and be more difficult, it does not take a long time to do it properly. It is critical to do the task thoroughly and accurately.


